Ball joints are critical suspension components that directly affect steering precision, wheel alignment, and vehicle safety. Over time, they wear due to constant load, road shocks, and environmental exposure. Replacing ball joints is a task that can be performed safely with the right tools, preparation, and technique. This guide explains how to replace ball joints safely, what tools are required, step-by-step procedures, and common mistakes to avoid.
Why Ball Joint Replacement Matters
Worn ball joints can lead to:
-
Loose or wandering steering
-
Clunking noises over bumps
-
Uneven tire wear
-
Reduced vehicle stability
-
In extreme cases, loss of steering control
Timely replacement ensures predictable handling and prevents damage to other suspension components.
Tools Required for Ball Joint Replacement
Before starting, gather all necessary tools to avoid unsafe improvisation.
Essential Tools
-
Hydraulic jack and jack stands
-
Wheel chocks
-
Socket and wrench set
-
Torque wrench
-
Ball joint separator or pickle fork
-
Ball joint press kit
-
Hammer and pry bar
Optional but Helpful
-
Penetrating oil
-
Breaker bar
-
Safety glasses and gloves
| Tool | Purpose |
|---|---|
| Jack & stands | Safely lift and support vehicle |
| Ball joint press | Remove/install press-fit joints |
| Torque wrench | Correct fastener tightening |
| Separator | Detach ball joint from knuckle |
Step-by-Step Ball Joint Replacement Process
1. Prepare the Vehicle
-
Park on a level surface
-
Engage parking brake
-
Place wheel chocks behind rear wheels
-
Loosen lug nuts slightly before lifting
2. Lift and Secure
-
Raise the vehicle with a jack
-
Support it securely on jack stands
-
Remove the wheel
Never work under a vehicle supported only by a jack.
3. Access the Ball Joint
Depending on the suspension design, you may need to remove:
-
Brake caliper and rotor
-
Stabilizer link
-
Control arm fasteners
Apply penetrating oil to rusted bolts.
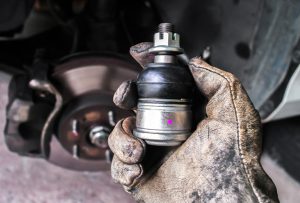
4. Separate the Ball Joint
-
Remove the cotter pin and nut
-
Use a ball joint separator or press
-
Carefully separate the joint from the steering knuckle
Avoid excessive hammering, which may damage surrounding components.
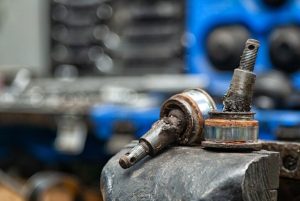
5. Remove the Old Ball Joint
There are two main designs:
| Ball Joint Type | Removal Method |
|---|---|
| Press-fit | Ball joint press |
| Bolt-on | Remove mounting bolts |
Clean the mounting surface thoroughly before installation.
6. Install the New Ball Joint
-
Press or bolt the new joint into place
-
Ensure correct orientation
-
Torque all fasteners to manufacturer specifications
For reliable replacement parts, Buy Ball Joint online
7. Reassemble and Lower the Vehicle
-
Reinstall removed components
-
Mount the wheel
-
Lower the vehicle
-
Torque lug nuts correctly
8. Wheel Alignment
After ball joint replacement, wheel alignment is mandatory to:
-
Prevent uneven tire wear
-
Restore proper steering geometry
-
Ensure vehicle stability
Common Mistakes to Avoid
Replacing ball joints incorrectly can create serious safety risks. Avoid these mistakes:
1. Skipping Safety Supports
Never work without jack stands — this is one of the most dangerous errors.
2. Incorrect Torque Values
Over-tightening or under-tightening fasteners can cause:
-
Premature wear
-
Component failure
-
Steering looseness
3. Damaging the Boot
A torn boot allows dirt and water inside, drastically reducing ball joint life.
4. Reusing Worn Hardware
Old nuts, bolts, or cotter pins may fail. Replace them when recommended.
5. Ignoring Alignment
Skipping alignment after replacement leads to poor handling and tire damage.
Signs Replacement Was Done Incorrectly
After replacement, watch for:
-
New noises when turning
-
Steering vibration
-
Uneven tire wear
-
Vehicle pulling to one side
These symptoms indicate improper installation or missing alignment.
Maintenance Tips After Replacement
To maximize service life:
-
Inspect boots during routine checks
-
Keep suspension components clean
-
Replace ball joints in pairs when possible
Quality parts and proper installation make a significant difference in durability.
Conclusion
Replacing ball joints safely requires the right tools, careful preparation, and attention to detail. By following correct procedures and avoiding common mistakes, you ensure precise steering, stable handling, and long-term suspension reliability. Whether you’re a DIY enthusiast or a professional technician, investing time in proper ball joint replacement pays off in safety and performance. When it’s time to replace worn components, choose dependable parts and Buy Ball Joint online to keep your vehicle driving confidently and securely.